iPad Hire Ireland for Events and Business Get reliable iPad hire Ireland services from One World Rental for conferences, corporate meetings, and training. Rent in
Knowing how to take a screenshot on a Mac is a handy skill for work, school, or sharing something interesting. Whether you’re using a MacBook or iMac, taking a screenshot on a Mac is simple thanks to built-in shortcuts and tools. This guide covers everything you need, from capturing the full screen to grabbing just a window or a selected portion.
If you want to take a screenshot of everything visible on your screen, follow these steps:
Press Command (⌘) + Shift + 3.
You’ll hear a camera shutter sound (if your sound is on), and the screenshot will automatically save to your desktop as a .png file.
Great for when you need a full Apple computer screenshot, like a webpage or presentation.

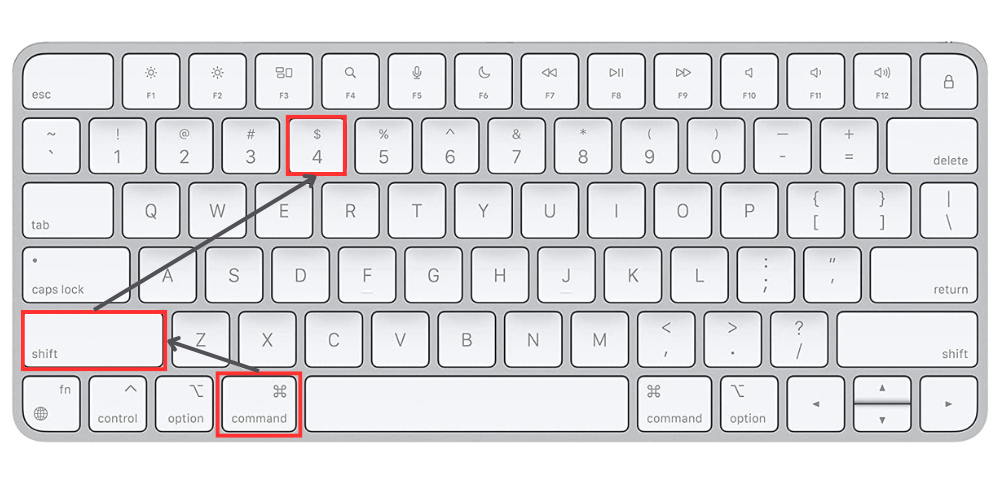
If you only need to capture a specific part of your screen, here’s how:
Press Command (⌘) + Shift + 4.
Your cursor will turn into a crosshair. Click and drag to select the area you want to capture.
Release the mouse button to take the screenshot. It will save to your desktop.
This is a useful method for anyone wondering how to take a screenshot on their Mac when only part of the screen matters.

To take a screenshot of a single window or application:
Press Command (⌘) + Shift + 4, then press the Spacebar.
The cursor will change to a camera icon. Move it over the window you want to capture.
Click on the window to take the screenshot. It will save to your desktop.
Ideal for users asking how to screenshot with a Mac when they need to isolate a single program or pop-up

If you want to take a screenshot and paste it directly into a document or image editor without saving it as a file:
Add the Control key to any of the above shortcuts. For example:
Command (⌘) + Shift + Control + 3 for the entire screen.
Command (⌘) + Shift + Control + 4 for a selected portion.
Command (⌘) + Shift + Control + 4, then Spacebar for a specific window.
The screenshot will be copied to your clipboard, and you can paste it (Command + V) into any application.
Great for those asking how do you take a screenshot with Mac and want to skip saving files.
iPad Hire Ireland for Events and Business Get reliable iPad hire Ireland services from One World Rental for conferences, corporate meetings, and training. Rent in
For more advanced screenshot options, macOS Mojave and later versions include a built-in Screenshot tool:
Press Command (⌘) + Shift + 5 to open the Screenshot toolbar.
From here, you can choose to:
Capture the entire screen.
Capture a selected portion.
Capture a specific window.
Record your screen (video).
You can also set a timer, choose a save location, and access other options from the toolbar.
Best for users wondering how can you screenshots on a Mac and looking for extra control or screen recording.

By default, screenshots are saved on your desktop as .png files. However, you can change the save location:
Open the Screenshot tool (Command + Shift + 5).
Click Options in the toolbar.
Under Save, choose a different location, such as Documents, Clipboard, or a custom folder.
If you’re searching for how do you screenshot Mac and prefer better file organisation, this tip helps.
Preview Screenshots: After taking a screenshot, a thumbnail will appear in the corner of your screen. Click it to quickly edit or share the screenshot.
Change the File Format: Use Terminal to change the default screenshot format to JPEG or another format.
Disable the Shadow Effect: When capturing windows, macOS adds a shadow effect by default. To disable it, press Command (⌘) + Shift + 4, then Spacebar, and hold the Option (⌥) key while clicking the window.
These tricks are useful for anyone asking how do you take a screenshot on Mac computer and wanting more control.
How to Take a Screenshot on MacBook Knowing how to screenshot on a MacBook is an essential skill whether you’re saving receipts, capturing ideas, or
Still, wondering how you screenshot on a Mac computer? Taking a screenshot on a Mac is a straightforward process, thanks to the variety of built-in tools and shortcuts. Whether you need to capture your entire screen, a specific area, or a single window, macOS has you covered. With the added flexibility of the Screenshot tool and clipboard options, you can customise your workflow to suit your needs. No matter if you’re searching for how to screen capture on a Mac or simply how to screenshot on a Mac, the methods above provide all the options you need.
Next time you need to capture something on your Mac, try these methods and make the most of your device’s capabilities! If you have any questions or need further assistance, feel free to reach out.
One World Rental is a leading global provider of IT and event technology rental solutions, specialising in short-term rentals for corporate events, conferences, exhibitions, and trade shows. They offer a wide range of high-quality equipment, including iPads, laptops, AV systems, POS solutions, event WiFi, and VR devices.
With an extensive inventory and a presence in over 50 countries, One World Rental ensures seamless event technology deployment, backed by expert technical support and professional event staffing solutions for events of all scales. Their services include on-site setup, remote assistance, and customised event solutions to enhance audience engagement and operational efficiency.